Sagaponack Corn Pudding

The ultimate corn pudding, from the Barefoot Contessa.  Sometimes the oldest recipes you know get forgotten, and it’s like seeing an old friend again.  Hello Sagaponack Corn Pudding!

This recipe makes a brilliant dish that honestly works for breakfast, lunch or dinner.  It’s a cross of a delicious crustless quiche, and a giant thick frittata, but fluffier and cheesier than both of those combined.  It is easy to make ahead, and great for a gathering all summer long.  It goes great with Tequila Lime Chicken, another recipe to come soon.

The recipe relies upon fresh corn, but if you absolutely cannot find it, I would skip the sautéing and just cook the onions, then add frozen corn (which is pre-cooked) to the recipe and I’m sure it would work great.  The dish bakes in a Ban Marie, (a hot water bath) almost like a cheesecake, helping with even cooking.  It may seem complicated but its incredibly simple and easy to do.

Sagaponack Corn Pudding

Print Recipe
Course brunch, dinner, Lunch
Cuisine American, Mexican
Keyword corn pudding
Prep Time 25 minutes
Cook Time 45 minutes
Total Time 1 hour 10 minutes
Servings 6

Ingredients

  • 4 Tbsp butter
  • 5 cups fresh yellow corn kernels cut off the cob 6 to 8 ears
  • 1 cup chopped yellow onion 1 onion
  • 4 extra-large eggs
  • 1 cup whole milk
  • 1 cup half-and-half
  • 1/2 cup yellow cornmeal
  • 1 cup ricotta cheese
  • 3 Tbsp chopped fresh basil leaves, plus more for topping
  • 1 Tbsp sugar
  • 1 Tbsp kosher salt
  • 3/4 tsp freshly ground black pepper
  • 8 oz grated extra-sharp cheddar, plus extra to sprinkle on top

Instructions

  • Preheat the oven to 375 degrees F. Grease the inside of an 8 to 10-cup baking dish.
  • Melt the butter in a very large saute pan and saute the corn and onion over medium-high heat for 4 minutes. Cool slightly.
  • Whisk together the eggs, milk, and half-and-half in a large bowl. Slowly whisk in the cornmeal and then the ricotta. Add the basil, sugar, salt, and pepper. Add the cooked corn mixture and grated cheddar, and then pour into the baking dish. Sprinkle the top with more grated cheddar.
  • Place the dish in a larger pan and fill the pan 1/2 way up the sides of the dish with hot tap water. Bake the pudding for 40 to 45 minutes until the top begins to brown and a knife inserted in the center comes out clean. Serve warm, sprinkled with more fresh basil.

Notes

This is a slightly adapted version of the classic Barefoot Contessa recipe from her Family Style Cookbook - here is the link to her site: https://barefootcontessa.com/recipes/sagaponack-corn-pudding
I have cut the butter in half, trying to lighten the dish a bit - I added 2 more ounces of cheddar, helping to make up for some extra flavor - the recipe works great with the butter change, but you can always add more if you like!
Continue Reading

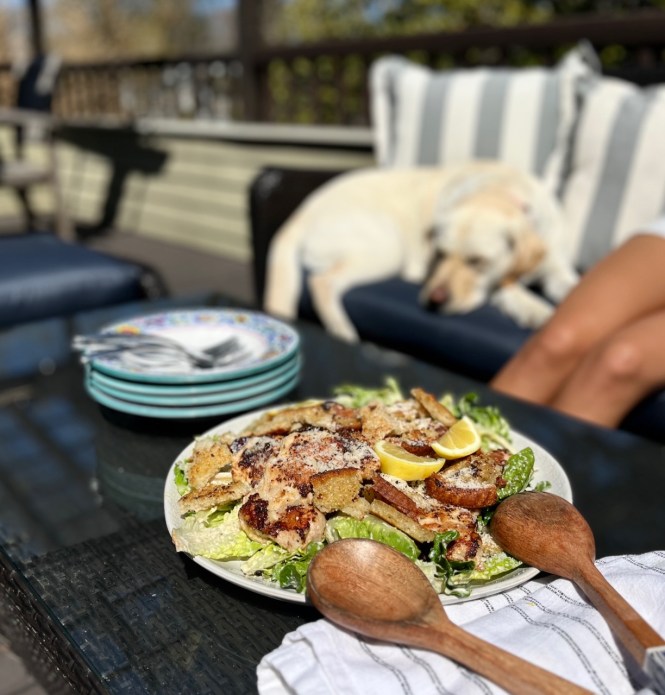
Genius Chicken Salad

A caesar inspired salad with sourdough croutons and chicken thighs.   As the weather turns warmer, this is the kind of thing you want for dinner and lunch the next day, so make extra!

Food52 is a website that has a section of recipes edited by Kristen Miglore that she deems “Genius.”  This is one of them, and I couldn’t agree more.  The dressing doubles as a marinade, and the sourdough slice of bread makes the best and easiest croutons ever – no flipping tiny cubes of bread for even cooking.  GENIUS.  

Per usual, I’ve tweaked this for my own tastes (and that of my kids) by removing the anchovies, replacing that with 2 tsp of Worcestershire sauce. It gives the same salty bite without the fishy taste.  I have made it both ways, and like my version better – it’s also easier than buying a tin of anchovies for just this salad.  

Genius Chicken Salad

Print Recipe
A caesar inspired salad with chicken thighs

Ingredients

  • 3 garlic cloves
  • 2 tsp Worcestershire sauce
  • 3/4 cup grated parmesan divided
  • 1 lemon
  • 1 cup mayo
  • 1 teaspoon soy sauce
  • 2 teaspoons Dijon mustard
  • 1 pound boneless, skinless chicken thighs
  • A few small heads crisp lettuces like Little Gem, romaine, or chicories
  • 2 - 4 tablespoons olive oil for cooking both the chicken and croutons
  • 2-3 thick slices of sourdough bread for croutons

Instructions

  • Finely chop the three garlic cloves. Transfer to a medium bowl. Finely grate ¾ cup Parmesan (about 1½ ounces) and add ½ cup to the bowl. Zest half of the lemon into the bowl. Stir in the mayo, soy sauce, Worcestershire ,and Dijon mustard, using a large whisk.
  • Transfer half the dressing to a shallow dish. Pat the chicken thighs dry, season with salt & pepper, then add to the dish and turn to coat.
  • Heat a large nonstick skillet over medium heat, and add two tablespoons olive oil when ready. Add the chicken and cook until golden brown and juices run clear, about 5 minutes per side. Transfer the chicken to a cutting board.
  • Separate the leaves of the lettuces and toss into a big bowl. Squeeze half the lemon (about 1½ tablespoons) over the greens, sprinkle with salt, then toss to combine. Add the remaining dressing and remaining ¼ cup Parm and toss to combine. Thinly slice the chicken. Add to the salad and season to taste with salt and pepper, lemon, and Parm.
  • For croutons, heat the olive oil in the skillet over medium-high (any flaky brown bits leftover from the chicken will add flavor). Add the slices of crusty bread and toast until golden brown, 2 to 3 minutes per side. Transfer to a cutting board and season with salt. Cut into croutons and sprinkle over the salad.

Notes

This salad comes from the Food52 website, where Kristen Miglore showcases what she considers to be Genius Recipes - they have always been foolproof for me, and this one is easy and quick, and deceptively delicious.  The simplicity of the marinade/dressing saves time and makes for easy prep.  The original recipe (tweaked here with a few changes) came from Ali Slagle.  https://food52.com/recipes/87742-not-just-another-chicken-caesar-salad-from-ali-slagle
Continue Reading

Spring Green Risotto

The Ultimate spring risotto with asparagus and peas, from the Barefoot Contessa.  This is one of my all time favorite recipes, and after years on repeat, I’m not tired of it in the least.  It’s the dish my sweet mother-in-law requests more than any other (aside from the lemonade cake!) and I’m always happy to make it – thank you INA!  

This is one of those recipes that doesn’t have room for change.  It’s just that good, and that reliable.  That said, I have figured out over many years of making this, one tiny step of improvement – one I think the Barefoot Contessa would approve of highly.  

Sometimes posting recipes from other cookbooks feels like cheating, but I often have minor changes and try to give credit where it’s due.  This is a good example, except I really don’t change any ingredients.  Just one step in the process.  I dislike blanching green veggies, and fishing out the slivers of ice cubes that reside at the end of the ice bath stage.  

This risotto is so full of fresh green veggies, I use frozen peas here.  Instead of defrosting them ahead of time, I place them in a bowl of cold tap water while blanching the asparagus, and simply add the drained asparagus to the now very chilled ice water bath of slowly defrosting peas.  The result is that the hot asparagus defrosts the peas fully, and the little cold peas shock the bright green color to the asparagus tips!  No lame slivery ice cubes to slide into a risotto without being noticed here…

Ultimately, the genius of this recipe comes from the combined elements of bright green vegetables bathed in silky rice that has the added benefits of nutty parmesan, creamy mascarpone, and loads of spring flavor in the bright lemon juice and zest.  It’s a perfectly balanced gem that deserves the spotlight year round, but especially right now – this screams spring.  

Spring Green Risotto

Print Recipe
the Ultimate Spring Risotto by the Barefoot Contessa
Course dinner, Lunch, Main Course
Cuisine Italian
Keyword risotto, spring risotto, spring green risotto, asparagus
Prep Time 10 minutes
Cook Time 35 minutes
Total Time 45 minutes
Servings 4

Ingredients

  • 2 Tbsp Butter
  • 1 Tbsp Olive Oil
  • 3 cups chopped leeks, white and green parts (2)
  • 1 cup chopped fennel (1 bulb)
  • 1 1/2 cups arborio rice
  • 2/3 cup dry white wine (I like pinot Grigio)
  • 5 cups warmed chicken stock or broth
  • 1 lb thin asparagus stalks
  • 10 oz frozen peas (not defrosted)
  • 1 Tbsp grated lemon zest (2 lemons)
  • kosher salt and black pepper
  • 2 Tbsp freshly squeezed lemon juice (from the 2 lemons above)
  • 1/3 cup mascarpone cheese (you can sub sour cream)
  • 1/2 cup freshly grated parmesan cheese
  • 3 Tbsp chopped chives, scallions, or microgreens (for garnish)

Instructions

  • To start, prep all your ingredients - risotto is easy to make, but it requires attention frequently enough so that you want everything ready. This includes heating the chicken stock so it's hot when you add it to the risotto - I use a small saucepan on the side, over low heat.
  • Heat the butter and olive oil in a large saucepan or a dutch oven over medium to medium-high heat. Add the leeks and fennel, sautéing for 5-7 minutes until tender. Add the rice, and stir for a minute to coat with the residual fat in the pan, and slightly toast the rice granules.
  • Add the white wine, simmering now over low heat, until fully absorbed, stirring the whole time with a wooden spoon, about 2 minutes. Now start adding ladles of the warm chicken stock, about 3/4 cup at a time, stirring frequently to continue to develop the starches from the arborio. It's not a constant thing - just every minute or so. This process should repeat for a total of about 25 minutes, until the risotto is fully cooked, continuing to add broth as it is absorbed. You will use the entire amount if done properly.
  • Meanwhile, prep for cooking the asparagus and defrosting the peas - this is a simple combined process. First, wash and remove the woody ends of the bottom 1/3 of the asaparagus stalks, and chop the remaining parts into 1 1/2 inch pieces. Bring a small pot of water to a boil, and while you wait, dump the frozen peas into a large bowl filled with some very cold tap water, so you can add the asparagus like an ice bath after blanching. Once the pot of water has come to a boil, salt it (1 TBSP), and add the asparagus pieces to blanche. Cook for about 3-4 minutes, until al dente. Drain, and add to the frozen pea water bowl - this acts like a bowl of ice water, but you don't have to remove the little pieces of ice at the end - the hot asparagus will defrost the peas, and everything is happy at the same time! Drain and set aside.
  • After cooking the rice for about 20 minutes, add the asparagus and pea mixture, along with the lemon zest, 1 1/2 tsp kosher salt, and 1 1/2 tsp crushed black pepper, stirring to combine. Continue adding the rest of the stock to complete the risotto cooking process.
  • Once the risotto is fully cooked (to al dente), remove the pot from the heat. In a small bowl, whisk the lemon juice with the mascarpone, and stir into the risotto with the grated parmesan. Taste for seasoning, and garnish with extra grated parmesan and the chopped chives or scallions.

Notes

This recipe is a Barefoot Contessa killer, from her ubiquitous Back to Basics book, one of my faves.  I have made it countless times, and my only real tweak is a blanching method time saving step of using the frozen peas to shock the asparagus, and simultaneously defrost those little peas - I never liked fishing out the slivers of remaining ice from a cold water bath after blanching.  Now it's one step instead of two!
Continue Reading

Cauliflower Mac with Rosemary Breadcrumbs

Oven Baked Shells with Cauliflower and Cheddar, topped with Rosemary Breadcrumbs.  A spin on a Jamie Oliver recipe hits all the right notes for January – comfort food with a touch of healthier ingredients.

There’s something overly indulgent about making a simple homemade Mac and cheese (in January, the month of healthier eating?). Somehow it’s all good if a little veg sneaks in to round out the base?  I feel strongly that this is delicious, and worth the effort – it’s health food after all!  I’m making this on Monday and Sunday and anything in between.  It just fits.  

This is a tweaked recipe from Jamie Oliver, a Brilliant British chef who makes real food easy and delicious.  A link to his version is here : https://www.jamieoliver.com/recipes/cauliflower-recipes/cauliflower-mac-n-cheese/. Mine has a little heat from red pepper flakes, and no fennel.  The thing I love about his approach is using everything you have (the green cauliflower stems included) and wasting little effort in the process (cook the pancetta in the same pan you bake the finished dish in). He’s truly inspiring.

Cauliflower Mac with Rosemary Breadcrumbs

Print Recipe
Oven baked shells with cauliflower and cheddar, topped with rosemary breadcrumbs
Course dinner
Cuisine Italian
Keyword baked pasta, cauliflower pasta.
Prep Time 10 minutes
Cook Time 20 minutes
Total Time 30 minutes
Servings 6

Equipment

  • Food Processor

Ingredients

  • 3 oz sliced pancetta rounds
  • 1 head cauliflower
  • 1 lb. dried pasta - I like shells
  • 10-12 oz grated sharp cheddar cheese
  • 1/2 day old baguette, torn into small pieces
  • 3 cloves garlic, minced
  • 1/2 tsp red pepper flakes
  • 1 sprig rosemary, chopped (about 1 Tbsp)
  • olive oil
  • 8 oz creme fraiche
  • parmesan cheese to serve

Instructions

  • Preheat oven to 425.
  • In a large baking dish, lay the pancetta slices out evenly and bake on the top shelf for about 10 minutes until crisp. Allow to cool a bit.
  • Bring a large pot of water to a boil. Trim the outer tough leaves on the cauliflower, and slice the head into four quarters. Remove the tough rind at the base, but keep the quarters in tact with some of the greens attached. When the water is boiling, salt it generously, and add the pasta and cauliflower together to cook according to package directions.
  • Fit the food processor with the grating blade, and grate the cheddar cheese, then set aside. Swap the blades for chopping, and remove the pancetta from the baking dish, leaving any fat behind as a base for the pasta dish. Grind the cooked pancetta with the chopped rosemary and the bread cubes adding about 2-3 Tbsp of olive oil to bring it all together. Set aside to top the pasta before baking.
  • When the pasta is done, remove 1 1/2 - 2 cups of the cooking water to use in the sauce. Drain the cauliflower and pasta, and dump it into the baking dish used for the pancetta. Mash the cauliflower into bite size pieces in the pan. Carefully add the cheddar, the garlic, red pepper flakes, the creme fraiche, and about 1 1/4 cups of the pasta water, checking to see if you need more. Taste for seasoning (I find it usually just needs a few grinds of black pepper, as the salted water does the trick). Top with the breadcrumbs, and return to the oven and bake for about 12 minutes until the mixture is boiling and the crumbs are golden brown.
  • Serve with grated parmesan on the side.

Notes

This recipe comes from Jamie Oliver, a genius British chef who is constantly inspiring me.  This is a balanced pasta that is simple to make and sits well for leftovers.  Jamie Oliver's website is here with his version, which is slightly different from mine:  https://www.jamieoliver.com/recipes/cauliflower-recipes/cauliflower-mac-n-cheese/
Continue Reading

Chicken with Mushrooms

Seared Chicken in a decadent mushroom cream sauce.  A slight riff on the classic Barefoot Contessa recipe, Chicken with Morels from Barefoot in Paris.  This uses dried shiitakes and is one of my favorite dinners of all time!

I made this dinner for some dear friends last night, and tripled the recipe to feed 18 people.  It is a fail-proof dish that makes everyone happy, and sits in the refrigerator so you can make it ahead and reheat when everyone arrives.  I served it with a green salad and rice, the simplest of sides as this dish is the standout star that needs nothing to back it up.  This would make a great meal for a ski weekend getaway too!

A couple of ingredient notes – the recipe calls for clarified butter, which you can either make (cook the butter until foamy in a pot, let it cool, and pour off the top dark rich butter, leaving the milk solids at the bottom of the pot) or purchase – Trader Joe’s sells it for $5 for 8 oz.  You can also use a combination of 1/2 butter and 1/2 olive oil to reduce the smoke point, which is the whole reason for using clarified butter.  Also, the recipe calls for Madiera wine, but a dry marsala or dry sherry works just as well.  

This recipe first caught my attention about 15 years ago when I saw it in an episode of the Barefoot Contessa where all of her dishes were made 5 days in advance!  This is one of the BEST make ahead meals I’ve ever had and it never disappoints.  

Chicken with Mushrooms

Print Recipe
Seared Chicken Breasts in a decadent mushroom cream sauce
Course dinner
Cuisine French
Keyword Chicken with Mushrooms
Prep Time 30 minutes
Cook Time 30 minutes
Total Time 1 hour
Servings 6

Ingredients

  • 1 oz dried mushrooms - any variety works, I like Shitake
  • 6 boneless, skinless chicken breasts
  • kosher salt and black pepper
  • 1/2 cup flour, for dredging
  • 1/4 cup clarified butter (see Notes below)
  • 1/3 cup chopped shallots
  • 3 cloves garlic, minced
  • 1 cup Madiera wine (a dry marsala or sherry works too)
  • 1 cup heavy cream
  • 8 oz creme fraiche
  • 2 Tbsp lemon juice

Instructions

  • Soak the dried mushrooms in 3 cups very hot water, for 30 minutes.
  • Preheat oven to 375 degrees.
  • After the mushrooms have soaked and are reconstituted, lift them carefully from the water, leaving any grit or dirt at the bottom of the bowl. Chop finely, and set aside for use later in the sauce.
  • Season the chicken breasts generously with salt and pepper, then dredge through flour and shake off the excess. Melt 2 Tbsp of the clarified butter in a large skillet over medium heat. Add three of the chicken breasts to the pan, cooking about 4-5 minutes a side until golden and seared, but not fully cooked through. Remove to an oven proof casserole dish, and cook the remaining chicken in a second batch. You don't want to crowd the pan, to ensure a golden sear on the chicken. Move the chicken to the casserole dish.
  • In the same pan add the rest of the clarified butter and cook the shallots, garlic, and chopped reserved mushrooms, stirring over medium high heat for about 5 minutes. Pour in the Madeira wine, and reduce to about 1/2, cooking for about 4 minutes. Add the creme fraiche, cream, and lemon juice, along with 1 teaspoon kosher salt and 3/4 tsp black pepper. Boil until the mixture starts to thicken, about 5-10 minutes. Pour the sauce over the chicken and bake for 15 minutes until the chicken is fully cooked through.
  • This dish can be made fully in advance, refrigerated, and then reheated at 325 degrees for about 25 minutes. It can sit for several days before reheating, and often tastes better this way.

Notes

This is one of my favorite recipes from the Barefoot Contessa - you can find it in her book, Barefoot in Paris.  I have a few changes and tips for making it easier, and cheaper.  First, her recipe calls for dried morels (I call it chicken with Mushrooms, her title is Chicken with Morels), which are about $20 an ounce.  I have tried all kinds of dried mushrooms, and they all work beautifully - I prefer shiitakes for the texture.  Second, the recipe calls for using clarified butter, which is either expensive, or time consuming to make.  You can buy Ghee (clarified butter) at Trader Joe's (pictured in the blog post) or use a mix of 2 Tbsp butter and 2 Tbsp olive oil, which will make the smoke point higher.  Last - if you can't find Madiera, dry sherry or dry marsala both work great and are a little less expensive.  This is a WIN of a recipe - thanks Ina!
Continue Reading

Buffalo Chicken Chili

Spicy Buffalo Chicken Chili with White Beans and Cheddar.  Seemingly we strive to eat like we live in a bar, and this one hits all hot buttons.  It’s hearty and healthy, and tastes like everything you want to eat right now.  Happy New Year!

Whether you spend your winter on the slopes, in the rink, or mostly on the couch, this soup is for YOU!  It’s delicious, and despite the incredibly rich flavor, it’s healthy and lighter than you’d expect.  Slightly tweaked version of the Half Baked Harvest Spicy White Buffalo Chicken Chili, it comes together in about 30 minutes start to finish and reheats well for the next day.  It’s great for game day and makes a great school lunch in a thermos.  

I used to be horrified at the amount of Frank’s Red Hot and Tabasco sauce we go through on a weekly basis.  I buy both at Costco now, regularly.  This recipe suits our family pretty well.  Goes great with skillet cornbread too.

Buffalo Chicken Chili

Print Recipe
Spicy Buffalo Chicken Chili with white beans and cheddar
Course Salad, Lunch, Dinner, snack
Cuisine American
Prep Time 10 minutes
Cook Time 25 minutes
Total Time 35 minutes
Servings 6

Ingredients

  • 2 Tbsp olive oil
  • 1 large yellow onion, chopped
  • 2 poblano peppers, chopped
  • 4 cloves garlic, smashed and minced
  • 1 Tbsp dried parsley
  • 1 Tbsp dried chive rings
  • 1.5 tsp dried dill
  • 1.5 tsp smoked paprika
  • 1 tsp kosher salt
  • 3/4 tsp black pepper
  • 1.5 lbs chicken thighs (boneless, skinless)
  • 5 cups chicken stock
  • 4 oz full fat cream cheese - room temp
  • 1 19 oz can of white beans, drained and rinsed
  • 1/2-3/4 cup Frank's Red Hot Sauce
  • 1/2 cup salsa verde
  • 1 cup shredded cheddar cheese
  • 1/2 cup chopped fresh cilantro
  • 1/4 cup chopped scallions
  • sliced avocado, cheddar, and sour cream for topping

Instructions

  • Heat the olive oil in a large stock pot, or a dutch oven, over medium heat. Add the onion and poblano peppers, sautéing until softened, about 5 minutes. Add the chopped garlic and all spices (parsley through black pepper) and cook for one more minute. Add the chicken and cover with the stock. Bring to a boil, then reduce to a simmer until the chicken is cooked through, about 20 minutes.
  • Pull the chicken out, and shred using two forks.
  • Add the cream cheese to the pot, slowly letting it melt into the broth. Using a whisk, make sure it's fully combined into a creamy consistency. Add the chicken back to the soup, along with the beans, salsa, buffalo sauce and cheddar cheese. Continue to cook for another ten minutes, until everything is heated through and melded together. Add the cilantro at the end.
  • To serve, ladle the chili into soup bowls, and top with cheddar, avocado, and sour cream or greek yogurt. I like extra cilantro and scallions too. This soup is great served with cornbread or tortilla chips.

Notes

This recipe is slightly adapted from Half Baked Harvest's Spicy White Buffalo Chicken Chili - I used chicken thighs instead of breasts, and increased the amount of chicken and beans slightly. I also prefer slightly less dill.  The recipe can also be made in a slow cooker - simply follow the first step, loading everything into the slow cooker, and cook on high heat for 3-4 hours.  Finish the soup the same way, adding everything at the end and cook for another 20 minutes or so.  I prefer the stove top method as it's quick and easy.  
Continue Reading

Christmas Pasta with Slow Cooked Chicken

The perfect winter pasta dish with slow cooked chicken, bacon, bay and allspice.  This simmers for hours, making the house smell incredible, ultimately leaving chicken that literally falls off the bones.

This recipe is taken from the Super Simple Cookbook from Half Baked Harvest, and is titled Caroline’s Family’s Chicken Mostaccioli – I switched a couple of things up, including the shape of the pasta.  I love the way these long noodles hold the pulled chicken together.  I am calling it Christmas pasta due to the all-spice and the fact that it just screams to be eaten at a family gathering.  Despite the inherently rich tasting sauce, this dish is incredibly light.  It’s the perfect thing for a cold night by the fire!

Christmas Pasta with Slow Cooked Chicken

Print Recipe
Pasta with slow cooked chicken, bacon, bay and all-spice.
Course dinner
Cuisine Italian
Keyword pasta, chicken pasta, slow cooked
Prep Time 20 minutes
Cook Time 4 hours
Total Time 4 hours 30 minutes
Servings 8

Ingredients

  • 5 slices thick cut bacon, chopped
  • 2 bone-in, skin-on chicken breasts
  • 3 bone-in, skin-on chicken thighs
  • kosher salt and black pepper
  • 1 large yellow onion, chopped
  • 4 cloves garlic, minced
  • 1 cup dry red wine
  • 2 cans tomato paste (6 oz each)
  • 4 cups water
  • 2 bay leaves
  • 1/2 tsp ground all-spice
  • 1 parmesan rind
  • 1 lb. dried pasta - I like Mafaldine for this
  • 1/2 cup grated parmesan

Instructions

  • In a large dutch oven, cook the bacon over medium-high heat until the fat has rendered and the bacon is crisp, about 6-8 minutes. Leave the fat in the pan, removing the bacon bits to a paper towel lined plate for later.
  • Sprinkle the chicken breasts and thighs liberally with kosher salt and black pepper. Working in two batches, sear the chicken skin side down in the bacon fat in the same pot over medium high heat. Flip to sear and then remove to the plate with the bacon bits to finish the rest of the chicken. Don't crowd the pan, as the chicken won't brown properly.
  • In the same pan, saute the onions in the leftover chicken and bacon fat, until translucent, about 5 minutes. Add the garlic and cook for one more minute. Add the wine, cooking to scrape all of the browned bits from the bottom of the pot. Add the two cans of tomato paste, cooking briefly to remove the raw taste. Slowly pour the 4 cups of water into the pot, stirring to combine the tomato paste into the liquid. Add the all-spice, and put all of the chicken and bacon bits back into the pot. Add the bay leaves and parmesan rind, and cover with a tight fitting lid. Reduce the heat to low and simmer for TWO HOURS, without opening the lid.
  • After the first two hours, remove the lid and continue to simmer for another 2-4 hours, uncovered.
  • When you are done cooking, remove the chicken to a separate large plate. Discard the skin and bones, shredding the meat into fine strips. Remove the bay leaves and parmesan rind, and then return the cooked chicken back to the pot, stirring to thicken the sauce. Taste for salt and pepper, and add as needed.
  • When ready to eat, cook the pasta according to package directions, and drain, reserving about 3/4 cup of the cooking liquid. Toss the cooked pasta into the sauce, along with 1/2 cup of grated parmesan. Thin with the reserved pasta cooking water as you like.

Notes

The pasta can be made up to three days in advance, and the sauce also freezes well in a sealed container.
Continue Reading

Garlic Yukon Gold Mashed Potatoes

Creamy garlic smashed Yukon gold potatoes – the only recipe you’ll ever need for this iconic side dish that needs a spot at everyone’s table this season.

Mashed potatoes make everyone happy.  This is the simplest recipe that requires no peeling, and takes only 25 minutes to cook due to the small dice on the potatoes.  Salting the water flavors the tubers throughout, lending to a creamy texture at the finish.  My best advice is to make EXTRAS!

Oven space can be at a premium over the holidays, and this is a stove-top recipe that also can easily be re-heated in a crock pot.  Make them a day or two in advance, and reheat on low for 30 mins to an hour before eating – just have some extra cream on hand if they seem a little dry.  

Garlic Yukon Gold Mashed Potatoes

Print Recipe
Creamy Garlic Yukon Gold Mashed Potatoes
Course dinner, Lunch, Side Dish
Cuisine American
Keyword MASHED POTATOES
Prep Time 10 minutes
Cook Time 25 minutes
Total Time 35 minutes
Servings 8

Ingredients

  • 4 lbs Yukon gold potatoes, washed and chopped (leave skin on!)
  • 4 cloves garlic - peeled and left whole
  • 1-2 Tbsp kosher salt
  • 1.5-2 cups heavy cream, at room temp
  • 10 Tbsp butter
  • fresh cracked black pepper

Instructions

  • Wash the potatoes, leaving the skin on, and chop into cubes that are about 2 inches in size. Fill a large pot with the potatoes, and cover with just enough COLD water to cover by 2 inches. Heavily salt the water (this is the only salt in the recipe, and it flavors the potatoes while they cook - I recommend 1-2 Tbsp).
  • Bring the potatoes to a boil and cook until the potatoes are fork tender, about 20 minutes. Drain, and throw back into the hot pot, leaving the cloves of garlic in the mix. Add the cream and butter to the potatoes, and mash to combine into a creamy consistency. Add a ton of cracked black pepper and taste for seasoning. You likely won't need any salt, but add if you prefer at this point.
  • ENJOY!

Notes

This recipe is easy to make ahead by 24 or 48 hours.  They can also be kept warm if covered in a low temp oven.  To save oven space at holidays, I have had great success putting these into my slow cooker and heating over low heat about 30 minutes before eating.  Have some extra cream on hand in case they need a little!
Continue Reading

Skillet Roast Chicken with Paprika and Caramelized Onions

Spice Rubbed Chicken Roasted in a Skillet on a bed of onions and garlic.  This is a spin on Molly Baz’s Pastrami Roast Chicken, which is stunning and delicious!

I love a good roast chicken.  My family?  They are okay with it.  Until this one came into the kitchen.  It’s SO GOOD!  Even my husband and son, who douse EVERYTHING in hot sauce, found this one didn’t need a thing.  The spice rub sits on the bird for at least an hour (ideally 6-8) and flavors and tenderizes the meat, while a high cooking temp ensures crispy skin and dinner is ready in an hour!

One of the best parts of this recipe is that it cooks in 55 minutes.  We tend to need a 4.5 lb chicken to feed our crew.   It was completely done in under an hour at 450 degrees.  One trick to this is the shallow roasting situation of the cast iron skillet, and sending the legs (tied) toward the back corner of the oven to ensure even cooking (the back left corner is supposed to be the hottest spot – who knew?).  

The other best part about this dinner is the bed of onion and garlic deliciousness that slowly cooks into caramelized perfection below the bird and all those schmaltzy drippings, making the ultimate condiment.  It’s one giant Visalia sliced into wedges, and a whole head of garlic cut in half horizontally, then cooked in the skins to result in perfectly roasted garlic goodness at the end!

Skillet Roast Chicken with Paprika and Caramelized Onions

Print Recipe
Paprika Dusted Whole Roasted Chicken on a bed of onions and garlic.
Course dinner, Lunch
Cuisine American
Prep Time 1 hour
Cook Time 1 hour
Total Time 2 hours
Servings 4

Ingredients

  • 1 whole chicken (4-5 lbs)
  • 1-2 yellow or white onions
  • 1 head garlic
  • 5 tbsp olive oil (divided)
  • 4 tsp kosher salt
  • 1 tsp black pepper
  • 1 Tbsp paprika
  • 1 Tbsp brown sugar

Instructions

  • Rinse and pat dry your chicken. You want a thoroughly dry bird to ensure crispy skin. Place the chicken in a large shallow bowl (I use a pie plate).
  • In a small bowl, combine the salt, pepper, paprika, brown sugar, and 2 Tbsp of the olive oil to form a paste. Take the paste and smear it all over the outside of the chicken, making sure to reach every spot. Place the chicken in the fridge for at least an hour to let the seasoning get into the skin and meat. Leave the chicken uncovered while resting in the fridge. Remove 20 minutes before roasting.
  • Preheat oven to 450 degrees with a rack positioned in the middle to lower third with plenty of room above.
  • Remove the outer skin, and slice the onions into 8ths, leaving the wedges in tact at the stem. Slice the head of garlic in half horizontally, leaving the skin ON - this will help the cloves not burn during the roasting. Scatter the onions and garlic in the bottom of a 12 inch cast iron skillet, tossing with 3 Tbsp of olive oil, as well as a liberal amount of salt and pepper to season the onions. This will form the roasting bed for your bird.
  • Place the chicken in the skillet, tying the legs together with kitchen twine. Tuck the wingtips into the sides of the bird to make sure they don't burn. Place the skillet into the oven, with the legs facing the back left corner of the oven, the hottest part. Roast for 50-60 minutes, depending on the size of your bird, and the temp of your oven. You want to make sure the onions don't burn, which may require tossing them once 1/2 way through. If the skin browns too quickly, you can loosely tent it with foil. The chicken should read 165 in the thickest part of the thigh when it's done.
  • Let the chicken rest for 15-20 minutes to ensure the juices stay in the meat when you carve it. Transfer to a cutting board, leaving the onions and garlic in the pan with the juices. Remove the legs, cut the breasts off the chicken, and slice into thick pieces for sharing. Drizzle the pan juices and carmelized onions on top of the chicken for serving.

Notes

This recipe is based on Molly Baz's "Pastrami Roast Chicken with Schmaltzy Onions and Dill" from her book, COOK THIS BOOK.  Her recipe is flawless, but I don't like dill, and adjusted the cook time a touch given I use a slightly larger bird here.  Molly is a genius and so is this recipe!  
Continue Reading

Thai Red Curry Noodles with Basil and Garlic Oil

Saucy Ramen Noodles with a Red Curry Garlic Oil and fresh basil.

Let me start this one by saying I literally hate curry.  I detest the flavor, and often am sad about that because there is a whole world of amazing food that I just don’t want to try.  That said, I have made this one work.  It’s an evolution of Half Baked Harvest’s 20 Minute Red Curry Basil Garlic Oil Noodles, https://www.halfbakedharvest.com/basil-garlic-oil-noodles/, with a few tweaks to reduce the curry flavor and amp up the others.  The end result works great, and has only a hint of something exotic in the curry direction.  This dish leans on fresh herbs, loads of them – basil, cilantro and scallions.  Garlic and ginger round out the red pepper flakes to balance the heat and give lots of depth to a very simple and QUICK noodle dish that makes everyone happy!

I buy Ramen Noodles at Whole Foods in a four pack, that comes without the seasoning.  If you can’t find those, just use the good old ramen at the grocery store and toss the flavor packets – you won’t need them!

This is one of those dishes that is great to make ahead, and tastes even better the next day – you may want to double this one up entirely.  I often serve it with a spinach salad on the side, but you can top it with roasted shrimp, grilled chicken, or even some sautéed mushrooms and kale.  

Thai Red Curry Noodles with Basil and Garlic Oil

Print Recipe
Red Curry and Ginger infused Ramen noodles with Basil and Garlic Oil
Course dinner, Lunch
Cuisine Thai
Prep Time 10 minutes
Cook Time 10 minutes
Total Time 20 minutes
Servings 4

Ingredients

  • 1/2 cup sesame oil
  • 1/2 cup sliced scallions
  • 1 -2 Tbsp Red Curry Paste
  • 4 cloves garlic, minced
  • 1-2 inch piece ginger, grated on a microplane
  • 1/2 tsp red pepper flakes (optional)
  • 1/2 cup chopped fresh basil, or Thai basil
  • 1/2 cup chopped fresh cilantro
  • 4 rounds ramen noodles (1 per serving)
  • 1/3 cup soy or Tamari sauce
  • chopped peanuts, sesame seeds, and herbs for topping

Instructions

  • This is a QUICK recipe, so prep all ingredients before you start to cook.
  • In a medium skillet, heat the sesame oil and the scallions for a few minutes over medium heat, until they are soft and fragrant. Off the heat, add the red curry paste and stir until combined and smooth.
  • Meanwhile, in a large bowl, combine the garlic, ginger, red pepper flakes, basil and cilantro. When the scallion oil is done, add this to the herbs to slightly cook the garlic and ginger with the basil and cilantro. This is your sauce.
  • Meanwhile, cook the ramen noodles according to package directions - I usually submerge in a pot of boiling water, off the heat, for 3 minutes. Drain the noodles and add to the oil and herbs in the bowl, tossing to combine with the soy sauce.
  • Top with chopped peanuts, sesame seeds, and extra basil, cilantro and scallions if you like.

Notes

This recipe is based on Half Baked Harvest's 20 minute red curry basil garlic oil noodles, https://www.halfbakedharvest.com/basil-garlic-oil-noodles/.  This is a genius recipe that is simple, fast and full of flavor.  I have adjusted a few items, including more herbs, the toppings, and less curry paste. 
Continue Reading
1 3 4 5 6 7 10