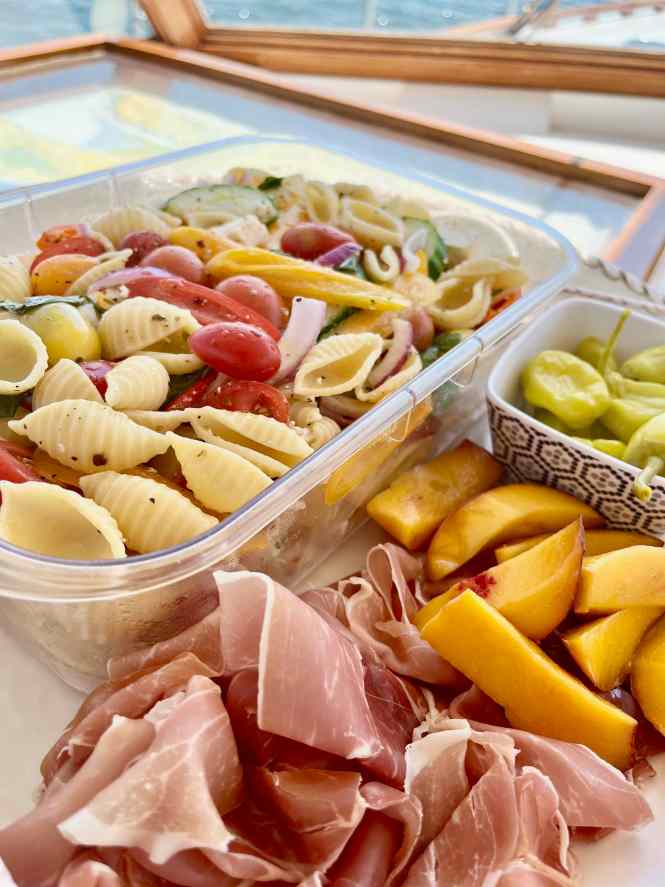
Cheesy Roasted Chicken and Sausage Meatballs

Oven Roasted Chicken and Sausage Meatballs with Marinara and Melted Provolone.  It’s an easy weeknight answer to a lighter version of meatballs for spring.

These meatballs are incredibly easy, and seem fit for the spring season when we still want warming food but something a bit lighter.  The combination of chicken sausage with straight up ground chicken keeps the flavor intense and the whole dish is incredibly delicious.  It takes only minutes to prep, and can be mostly made in advance.  

The photo above is missing the marinara, but you can always assume it’s Rao’s in our house – feel free to substitute with whatever you prefer.  

The meatballs are first roasted on a baking sheet, ensuring a golden exterior, then they are added to a baking dish, topped with sauce and finished with a final round of melty mozzarella and provolone.  This is not the time for fresh mozzarella; stick with the block style you can shred yourself, or buy pre-packed shredded cheese. 

Cheesy Roasted Chicken & Sausage Meatballs

Print Recipe
Oven roasted Chicken and Sausage Meatballs with Marinara and melted provolone.
Course dinner
Cuisine American, Italian
Keyword Chicken Meatballs, Roasted Meatballs
Prep Time 15 minutes
Cook Time 25 minutes

Ingredients

  • 1 lb. ground chicken
  • 1 lb. chicken or pork sausage, removed from casings
  • 2 eggs, beaten
  • 2 large shallots, minced
  • 2 cloves garlic, minced
  • 3/4 cup Italian seasoned breadcrumbs
  • 1/2 cup grated parmesan
  • 3/4 tsp red pepper flakes
  • 3/4 tsp oregano
  • 2 Tbsp chopped fresh parsley
  • 2 Tbsp chopped fresh basil
  • kosher salt and black pepper
  • 1/4 cup water
  • 1/4 cup olive oil, for brushing the tops of the meatballs
  • 32 oz jar Rao's Marinara, or any brand you like
  • 8 oz grated mozzarella - not fresh
  • 6 slices provolone cheese
  • fresh oregano, for garnish

Instructions

  • Preheat oven to 425 degrees, and line a baking sheet with parchment paper.
  • In a large bowl, combine the ground chicken and sausage, mixing with a fork to loosen the meat and break it up. Add the beaten eggs, shallots, garlic, breadcrumbs, parmesan, pepper flakes, oregano, parsley, basil, and 1/2 tsp each salt and pepper, and add about 1/4 cup tap water. Continue to mix everything using the fork so to not condense the mixture, but bring it together lightly.
  • Using an ice cream scoop, form approximately 20 meatballs onto the prepared baking sheet. Using a basting or pastry brush, glaze the top of each meatball with a thin coating of olive oil. Bake for 15 minutes, then remove from the oven to put the meatballs into a 9 x 12 baking dish. Pour the marinara sauce over the meatballs, top with foil, and return to the oven for another 10 minutes.
  • Pull out the baking dish, top with the provolone and shredded mozzarella, and bake for another 8-10 minutes until the cheese is melty and the sauce is bubbling. Top with fresh oregano, and enjoy!

Notes

Ideally this recipe would be made with chicken sausage to keep them lighter, but pork sausage works fine as well.  
To make these ahead, work through the first baking step, pour the sauce over the meatballs, cover with foil, and finish the process from there when you are ready.  I don't recommend fully cooking in advance, as the lean chicken can get tough if overcooked.  
Continue Reading

Oven Baked Nashville Hot Honey Chicken Tenders

A delicious oven baked version of Nashville Hot Honey Chicken, served with Creamy Homemade Honey Mustard.  These tenders are bathed in a spicy honey butter sauce at the end that takes them over the top!  This is a crowd pleasing favorite.  

This recipe is basically a cornflake crusted chicken tender that is instantly bathed in a spicy hot honey butter sauce when taken out of the oven.  The sauce becomes part of the crust, and flavors the chicken intensely.  The combination of sweet from the cornflakes balances everything perfectly.  

The creamy honey mustard dip is easy to make and doubles as a great turkey sandwich spread – this recipe makes a lot, but you will like having some leftover.  

Oven Baked Nashville Hot Honey Chicken Tenders

Print Recipe
A healthier version of Nashville Hot Honey Chicken with Homemade Honey Mustard
Course dinner, Lunch
Cuisine American
Keyword chicken tenders, nashville hot honey chicken
Servings 6

Ingredients

Chicken Tenders

  • 3 lbs chicken tenders
  • 3 cups buttermilk
  • 2 tsp kosher salt
  • 4 cups cornflake crumbs (12 cups cornflakes ground into 4)
  • 1/4 cup flour
  • 1 tsp chopped fresh thyme
  • 2 tsp kosher salt
  • 3-4 Tbsp olive oil
  • 8 Tbsp salted butter, melted
  • 3 Tbsp Honey
  • 3 tsp cayenne pepper
  • 3/4 tsp chili powder
  • 3/4 tsp garlic powder
  • 3/4 tsp paprika

Homemade Creamy Honey Mustard

  • 1 cup plain greek yogurt (with some fat)
  • 2 Tbsp dijon mustard
  • 2 Tbsp Honey
  • 1 Tbsp Whole grain mustard
  • 1 tsp kosher salt
  • 3/4 tsp paprika
  • 2 tsp buttermilk

Instructions

Chicken Tenders

  • Place the chicken tenders in a large glass bowl with the buttermilk and kosher salt, allow to sit in the fridge for at least 20 minutes, up to overnight.
  • Pulse 12 cups of cornflake cereal in a food processor until you have about 4 cups of crumbs. Place in a shallow dish and mix in the flour, thyme, and salt.
  • When ready to make, preheat the oven to 425 degrees. Line two baking sheets with parchment paper
  • Remove the chicken tenders from the buttermilk, and dredge in the cornflake crumb mixture. Place them with space between, on the baking sheets. Drizzle the tenders with olive oil, and bake for 15 minutes. Flip the tenders, continue to bake for another 10 minutes until thoroughly cooked (165 degrees).
  • While the chicken is baking, heat the butter in a small saucepan, and stir in the other ingredients for the hot honey (butter through paprika). When the chicken is done, spoon the hot honey sauce over the tenders while hot - sprinkle with extra kosher or flaky salt. Allow to set for a few minutes.

Homemade Creamy Honey Mustard

  • Combine all ingredients in a bowl, using the buttermilk at the end to thin to your desired consistency. This will keep in the fridge for several days.

Notes

These chicken tenders are based on a recipe from Tieghan Girard at Half Baked Harvest. https://www.halfbakedharvest.com/oven-fried-chicken/ Her idea's are amazing - I have only tweaked a few things, but the honey mustard is my own.  
The Honey Mustard is great on a turkey sandwich too!
Continue Reading

Buffalo Chicken Pizza

March is here and we are still on a buffalo chicken kick!  This time in a pizza.  This one has everything you love about wings, with the bonus of being on pizza, and it’s topped with fresh garlic and herbs – can we call that healthy?  

This is a recipe from Half Baked Harvest, she’s the queen of game day food, and I have only changed a few things here.  The key to this pizza is that herb topping – you can use whatever you have on hand – cilantro, basil, parsley, chives, scallions – just chop them up finely and mix with the red pepper flakes, fennel seeds and fresh garlic and you will love it.  This is so good I plan to use it on all kinds of pizza’s!

One short cut for this pizza is using rotisserie chicken – I often buy it at Costco in sealed packages of all white meat already pulled off the bones!  Alternatively, you can roast skin on, bone in chicken breasts at 375 for 30-35 minutes and just pull the meat off yourself.  Either way, it’s pretty easy.  

Buffalo Chicken Pizza

Print Recipe
Buffalo Chicken Pizza topped with green herbs and fresh garlic
Course dinner, Lunch
Cuisine American, Italian
Keyword buffalo chicken pizza
Prep Time 15 minutes
Cook Time 15 minutes
Servings 6

Ingredients

  • 1 lb pizza dough at room temp I like Whole Foods or Trader Joe's
  • 1 cup shredded cooked chicken I use Rotisserie
  • 1/2 cup Frank's Red Hot Sauce
  • 2 Tbsp chopped fresh chives, divided
  • 1 tsp dried parsley flakes
  • 1/2 cup chopped fresh cilantro or parsley
  • 2 Tbsp chopped fresh basil
  • 1/2 tsp red pepper flakes
  • 1 clove garlic, grated
  • 1/2 tsp fennel seeds
  • 1/3 cup ranch dressing See notes for homemade
  • 1 cup freshly grated whole milk mozzarella don't use fresh
  • 1 cup shredded cheddar cheese
  • 1/2 cup grated parmesan cheese

Instructions

  • Preheat oven to 500 degrees, at least 30 minutes ahead of cooking. Position a rack in the center of the oven.
  • Using your hands, stretch the pizza dough into a large rectangle, and then use a rolling pin to spread it to fit a 1/2 sheet baking pan, or a cookie sheet with edges. I like to coat the bottom of the baking sheet with a tablespoon of olive oil as well.
  • Mix the torn chicken in a small bowl with the Frank's Red Hot Sauce, 1 Tbsp of the chopped chives, and the dried parsley flakes.
  • To make the Herb topping, combine the chopped cilantro (or parsley), basil, red pepper flakes, garlic, and fennel seeds. Set aside.
  • To build the pizza, use a spatula to spread a thin layer of the ranch dressing, then scatter the chicken over the top, distributing evenly. Top with all three kinds of cheese, and finally top with the herb blend.
  • Bake at 500 degrees for about 12-15 minutes, until the edges are golden brown and the cheese is bubbling. Remove and let sit for a few minutes to allow it to cool. Top with extra chopped basil, cilantro, ranch and Frank's as you like it!

Notes

This recipe is based on Tieghan Girard's Half Baked Harvest Sheet Pan Buffalo Chicken Pizza - I adjusted a few ingredients, but it's her genius idea of the herb seasoning that  makes this pizza over the top delicious!  
 homemade ranch dressing use 1/2 cup each of greek yogurt and sour cream, add 2 Tbsp buttermilk, 2 tablespoons fresh chopped chives, 1 teaspoon dried parsley, 1 teaspoon dried dill, 1/2 teaspoon garlic powder, 1/2 teaspoon onion powder, and a pinch each of kosher salt and black pepper.  This will make extra for topping and eating veggies on the side!
Continue Reading

Warm Goat Cheese Salad with Macerated Shallot Vinaigrette

Crispy Seared Goat Cheese medallions served on salad greens tossed with a shallot vinaigrette.

This salad is one of our favorites – there’s no better way to get everyone to eat their greens, than by topping it with fried goat cheese!  Kids and grown ups will love this one – it’s a riff on the classic Barefoot Contessa Salad with Warm Goat Cheese, from her Parties cookbook.  The dressing comes from Erin French, and I think it pairs well with the goat cheese, and is simpler than Ina’s.  Erin French is the genius behind the famed Lost Kitchen, in Freedom, Maine. 

This dressing is always on hand in our fridge – it’s literally one shallot minced, covered with rice wine (or white wine) vinegar, then finished with olive oil, salt, and pepper.   The beauty of it comes from the tanginess of the shallots after macerating in the vinegar for about 20 minutes – they break down a bit and add great flavor  to salads.  You can also spoon it over grilled fish or chicken.  

The goat cheese medallions get coated in fresh soft white breadcrumbs, and then are pan seared in olive oil and butter.  Ideally you would make these right before serving, but if you must make them ahead, it’s possible to fry them and store for reheating later at 300 degrees for about 8 minutes.  You will want the insides to soften but maintain a crispy crust on the outside.  

Warm Goat Cheese Salad with Macerated Shallot Vinaigrette

Print Recipe
Crispy Goat Cheese Medallions on Salad greens tossed with a shallot vinaigrette
Course Appetizer, dinner, Lunch
Cuisine American, French
Keyword goat cheese salad, vinaigrette, shallot vinaigrette
Servings 6 people

Ingredients

Macerated Shallot Vinaigrette

  • 1 shallot, minced
  • 1/4 cup Rice Wine Vinegar
  • 1/2 tsp kosher salt
  • 1/2 tsp cracked black pepper
  • 1/2 cup olive oil

Warm Goat Cheese Medallions

  • 11 oz log of plain goat cheese, cold
  • 4 slices soft white bread
  • 2 large eggs
  • 2 Tbsp each, butter and olive oil, for frying

For the Salad

  • 6 cups mesclun greens, arugula, or spinach

Instructions

For the Macerated Shallot Vinaigrette

  • Combine the shallots with the rice wine vinegar in a small jar, allowing it to rest and macerate for at least 20 minutes, while you make the goat cheese medallions.
  • After 20 minutes, add the kosher salt, black pepper, and olive oil. Place the lid on the jar and shake vigorously to combine - set aside.

Warm Goat Cheese Medallions

  • Cut the crusts off of the bread, and chop into small cubes. Load them into a food processor, and pulse until you have small soft breadcrumbs. Pour them into a shallow bowl for dredging.
  • In a small bowl, whisk the two eggs with 1 Tablespoon of water.
  • Using a small sharp knife, or a piece of dental floss, slice the goat cheese into 12 even slices. Dunk each slice into the egg wash fully, then coat with the breadcrumbs, pressing to adhere. Set all 12 slices on a plate and refrigerate for at least 15 minutes to make sure they are cold when you cook them. This way the cheese won't melt before the coating cooks.
  • When ready to cook, heat 1 Tbsp each of olive oil and butter, and evenly space 6 slices of the breaded goat cheese medallions. Cook until the breadcrumbs are golden brown on each side, and the goat cheese is just starting to melt inside. Set aside on a plate and cook the remaining goat cheese slices.

Assemble the Salad

  • When ready to serve, toss the greens with the dressing, adding salt to taste as needed. Top each salad with two goat cheese medallions, and finish with cracked black pepper.

Notes

This recipe is a spin on the Barefoot Contessa's Salad with warm goat cheese, using a slightly tweaked version of Erin French's Macerated Shallot Vinaigrette.  I love how Ina uses the fresh breadcrumbs to coat the goat cheese, as they lend a great consistency to the coating when pan seared.  The dressing is classic Erin French (The Lost Kitchen) where simplicity rules.  
This is one of my daughter's absolute favorite things to eat - I have worked on how to make extra for eating later, and while nothing beats fresh out of the pan goat cheese, you can store these (fully cooked) in the fridge, and reheat for 5 minutes in a 325 degree oven.  The dressing keeps great for at least a week.  
Continue Reading

Roasted Zucchini and Sausage Lasagna with Garlic Oregano Breadcrumbs

The Ultimate Lasagna made up of the best parts of my favorite recipes in one dish that hits all the notes – sausage, roasted zucchini, goat cheese, and it’s all topped with garlic oregano breadcrumbs.

January is definitely a good lasagna month.  It’s really long, cold, and there’s not always a ton to look forward to, so lasagna can help.  This one is really helpful.  It is the culmination several recipes folded together to make my ideal version of this amazing dinner – and it can be made ahead.  We are expecting up to two feet of snow here this weekend, so let’s do this!

My two favorite lasagna recipes are both from the Barefoot Contessa, and I’ve been making them for years.  This recipe idea came from a desire to make both at once.  I know some people don’t like ricotta cheese, and I feel bad for them about that.  I think they’re missing out.  One trick to make the ricotta issue go away is to combine goat cheese into the mixture.  It ramps up the flavor and helps with the texture issue that likely is the root of it.  Ina was a genius for putting goat cheese in lasagna and I promise to always follow suit.  

The recipe has a few steps to prepare your layers, but it’s all easy and can be done simultaneously.  It’s best to have the ingredients not screaming hot, so plan to let the sauce cool a bit before assembly.  

Roasting the zucchini reduces the moisture content while also adding flavor – it’s a great trick for making any baked dish with vegetables.  Ina’s Roasted Vegetable Lasagna calls for Eggplant and Zucchini – I prefer to use only zucchini, but you could use whatever you like.  

Roasted Zucchini and Sausage Lasagna with Garlic Oregano Breadcrumbs

Print Recipe
the ultimate lasagna filled with roasted zucchini, sausage, goat cheese, and topped with garlic oregan breadcrumbs.
Course dinner
Cuisine Italian
Keyword lasagna, roasted vegetable lasagna, sausage lasagna
Servings 8 people

Ingredients

  • 3-4 small zucchini squash sliced lenghwhies, 1/4 inch thick
  • 1/4 cup olive oil, plus 2 Tbsp later
  • kosher salt & black pepper
  • 3 tsp dried oregano, divided
  • 2 Tbsp minced garlic (about 4 cloves), divided
  • 10 oz no boil flat lasagna noodles
  • 1 lb. mild chicken sausage, removed from casings
  • 16 oz whole milk ricotta cheese
  • 8 oz plain goat cheese (at room temperature)
  • 2 xl eggs, lightly beaten
  • 1/2 cup chopped fresh basil leaves
  • 2 tsp red pepper flakes (optional), divided
  • 1 cup freshly grated parmesan cheese, divided
  • 40 oz Rao's Marinara Sauce
  • 1 lb. fresh mozzarella
  • 1/2 cup Panko breadcrumbs

Instructions

  • Preheat the oven to 375 degrees. Line a baking sheet (or two if needed, don't crowd the pans) with the sliced zucchini, leaving a little space between them. Drizzle them evenly with olive oil, salt, pepper, 1 tsp of the dried oregano, and some red pepper flakes (1 tsp, if desired). Roast for 20 minutes, then add 1 Tbsp of the minced garlic, roasting an additional 5-10 minutes until the zucchini is slightly golden and shrunken a bit. This is the sign that the vegetables won't make the lasagna watery. Set the zucchini aside to cool a bit before assembly.
  • Set the oven temp to 350 degrees. Fill a large baking dish with the hottest tap water, and slide the lasagna noodles into the water, one by one to prevent sticking. Allow them to soak for about 15 minutes until they are slightly softened, but not cooked.
  • In a large saute pan, or sauce pot, cook the sausage in 1 Tbsp olive oil, breaking up into small pieces until no longer pink. Add the Rao's to the pot with the sausage, and cook over medium low heat for a few minutes to let the flavors meld. Set aside for assembly.
  • In a medium sized bowl, combine the ricotta, goat cheese, beaten eggs, chopped basil, red pepper flakes (if using) and 1/2 cup of the grated parmesan (reserving the rest for topping). I use a whisk to break up the goat cheese into the ricotta, and it's important to have the goat cheese at room temperate so it combines evenly.
  • When ready to assemble, make sure all of your ingredients are cooled enough to the touch. Starting with 1 1/2 cups of marinara, coat the bottom of a 9x13 baking dish, then arrange the zucchini slices on top - this can be done in one or two layers, depending on how big your slices are. Lay the lasagna noodles on top of the zucchini, then top with 1/3 of the sliced mozzarella, and 1/3 of the ricotta cheese mixture, in dollops to fit between the mozzarella. Repeat the process twice more, starting with the marinara, and finish with one final thick layer of marinara on the very top. Sprinkle the remaining 1/2 cup grated parmesan cheese, and either wrap the lasagna to bake later, or place in the oven at 350 degrees for 35-40 minutes. If cooking from the fridge or freezer, adjust the cooking time to accomodate (45-55 minutes should do it).
  • While the lasagna is baking, toss the Panko in 2 Tbsp olive oil, 1 Tbsp of the chopped garlic, 1 tsp of the oregano, red pepper flakes (optional) and 1/2 tsp each of kosher salt and pepper into a small saute pan, heating to toast to a golden brown color. When ready to serve, sprinkle the toasted breadcrumbs on top of the lasagna.

Notes

This recipe is extremely versatile and easy to make ahead.  You can omit the sausage to make it vegetarian, and adjust the level of spice however you like.  It works to bake directly from the fridge or freezer (just note extra baking times in the recipe).  
The lasagna combines my favorite parts from several different recipes, making it what I consider the ultimate dish.  Most notably, Ina Garten's Lasagna with Turkey Sausage https://www.foodnetwork.com/recipes/ina-garten/turkey-lasagna-recipe-1915666, and her Roasted Vegetable Lasagna https://barefootcontessa.com/recipes/roasted-vegetable-lasagna.  I also found inspiration for the breadcrumbs from Half Baked Harvest, which might be the best part (Tieghan uses these on many recipes, here is her blog) https://www.halfbakedharvest.com . 
Continue Reading

Seared Flank Steak and Blue Cheese Quesadillas

Seared Flank Steak Quesadillas, with melty blue and cheddar cheese, and spicy red and green onions.  A perfect weeknight family dinner, and a game day treat you can make ahead for a crowd.  Even if the Pats aren’t playing this weekend…


When I first got married, I really wasn’t much of a cook.  This was one of the first things I came up with when I started figuring things out.  It was inspired by our love of getting a good steak with blue cheese melted on top, but making it more economical and weeknight friendly.  It remains one of our favorite dinners, and now our kids love it too.  It’s easy, fast, and definitely much cheaper than a night out at a steak house – especially for 6.  

The only trick I have to share for making a good quesadilla is to make sure to layer cheese on either side right against the tortilla, and cover the top with something (either a pan lid or tinfoil) while you cook it, so ensure the cheese will melt properly.  

Seared Flank Steak and Blue Cheese Quesadilla's

Print Recipe
Seared Flank Steak Quesadilla with melty blue and cheddar cheese, red and green onions
Course dinner, Lunch, Snack
Cuisine American
Keyword steak quesadilla
Prep Time 10 minutes
Cook Time 20 minutes
Total Time 30 minutes
Servings 6 people

Ingredients

  • 1.5 lbs flank steak
  • Avocado oil, Salt & Pepper for the steak can also use canola oil
  • 8 oz freshly grated sharp cheddar cheese
  • 8 oz crumbled blue cheese
  • 1 small red onion, halved, then sliced very thin
  • 2 bunches scallions, chopped
  • 12 flour tortilla's I like Trader Joe's Homestyle
  • sliced avocado, sour cream and cilantro for serving

Instructions

  • Heat a Cast Iron skillet over medium/high to high heat. Rub the flank steak with a generous coating of kosher salt and cracked black pepper. Set aside until skillet is ready.
  • When the skillet is very hot, pour 1-2 Tbsp Avocado or Canola Oil (something with a high cook point), and add the steak, cooking until well seared and the skin releases from the pan - flip, and continue to cook to your desired level of doneness. I suggest not over-cooking, as the steak will continue to heat in the quesadilla's. I do about 4-5 minutes a side for medium rare. Let the steak rest, then slice thinly against the grain for use in the quesadilla's.
  • Wipe out the skillet, and reheat over medium-low heat while you prepare the quesadilla ingredients. When ready, place another tablespoon or two of the oil, lay down a tortilla, top with cheddar cheese, sliced steak, red onion, chopped scallions, and finish with the crumbled blue cheese and the top tortilla. I use a lid from a small saucepan to top the quesadilla while it cooks, to help melt the cheese inside. You can also use a piece of tinfoil for this. When the cheese is melting and the tortilla is golden brown, flip and continue heating on the other side. The total process only takes about 5-7 minutes. Repeat with the remaining ingredients, using another tablespoon of oil for each quesadilla. Let the quesadilla's rest for a few minutes before cutting into triangles. Serve with sliced avocado sour cream, and chopped cilantro.

Notes

These can be made ahead and either kept warm in a low oven, or reheated for later use.  They are great as leftovers, and you could cut into small triangles for a game day appetizer.  
Some kids (and adults) don't like blue cheese - feel free to use just cheddar as they will still be delicious!
Continue Reading

Skillet Roasted Mexican Chicken

Mexican spiced chicken breasts with melted cheese, seared and roasted in a cast iron skillet.  Easy for a weeknight and delicious enough for a weekend!

This is one of those recipes that isn’t much of a recipe, but more a method.  It mimics blackened chicken, but with a Mexican twist.  We love Mexican food, and this is an easy way to make a start to a meal that spins into many variations – pleasing different needs with one main course.  Add it to a burrito bowl with rice and beans, top a salad, or just eat the chicken on its own – it all works.  

The simplicity of this recipe is why it shines – it’s easy, fast, and uses only a few ingredients.  The chicken is seasoned with taco spices, pan seared, then roasted with cheese on top to finish in the oven.  This process leads to juicy chicken, without the hassle of trying to perfectly cook chicken through on the stove top.  I love Trader Joe’s taco seasoning, or you can use this recipe for homemade if you have time – 

https://walestable.com/oven-baked-tacos-with-cilantro-ranch/

This method for cooking chicken works in a million recipes – blackened, just salt and pepper, with or without cheese.  The ease comes from the circulatory heat of the oven evenly cooking the chicken breasts all the way through instead of relying on heat from the pan to do all the work.  

Skillet Roasted Mexican Chicken

Print Recipe
Mexican spiced chicken breasts, pan seared and oven roasted with melty cheddar and pepper jack
Course dinner
Cuisine Mexican
Keyword Mexican, Chicken, Roasted Chicken, Skillet Chicken
Prep Time 5 minutes
Cook Time 25 minutes
Servings 6 people

Ingredients

  • 6 split chicken breasts
  • 2 Tbsp Mexican or Taco Seasoning (my recipe link in notes below, or store-bought)
  • 3 Tbsp Canola or Avocado Oil
  • 12 oz Grated Cheese Cheddar, Pepper-Jack, Montery Jack - anything you like!
  • sliced avocado, cilantro, sour cream for toppings

Instructions

  • Preheat the oven to 350 degrees, and position a rack in the center of the oven
  • Heat an oven-safe skillet over medium heat - I prefer cast iron for recipes like this.
  • Rinse and pat the chicken breasts dry, then season liberally with the taco or Mexican seasoning on both sides.
  • Heat the oil in the skillet, and sear the chicken breasts (three at a time, so in two batches) for about 7 minutes , then flip for a minute or two. Remove to a plate, and then repeat with the remaining three chicken breasts. When done, load all of the chicken back into the skillet, leaving the more cooked sides facing UP. Top evenly with the grated cheese, and throw the skillet into the oven to roast for approximately 8-12 more minutes, depending on the thickness of your chicken breasts. NOTE: if you are only making 3 or 4, you can do this whole process in one step, but if you do more than that the chicken won't sear properly. Alternatively, you can use two skillets at the same time, and roast simultaneously as well. Chicken is cooked when it reaches 160 degrees - it will continue to cook as it sits in the pan out of the oven.
  • When the chicken has rested, serve sliced over Spanish rice, a salad or chopped into taco's. This is a great leftover item for lunch the next day. Toppings like sliced avocado cilantro, salsa and sour cream are great additions. Enjoy!

Notes

This is a very adaptable recipe that makes great leftovers - the chicken stands alone, goes great with rice, salad, into tacos or quesadilla's, burritos - you name it.  It tastes just as good the next day, and is quick and easy with little prep and only one pan.
Taco seasoning - you can use this recipe, or make your own, and store bought is great too - I love Trader Joe's taco seasoning.  https://walestable.com/oven-baked-tacos-with-cilantro-ranch/
Continue Reading

Weeknight Bolognese

Easy pasta bolognese, delicious and simple – from the Barefoot Contessa!

This recipe is completely untouched as it is perfection in a bowl – Ina Garten’s Weeknight Bolognese cannot be improved upon.  It’s one of the recipes that made me want to start this blog – worth sharing and repeating, again and again.  We used to make it every Friday night – it’s also showing up on birthdays and would be an amazing Christmas dinner!

Critics say this isn’t bolognese, as it doesn’t have the long list of ingredients and doesn’t take all day to simmer.  The simple fact is that it tastes as good as the real deal, and is honestly one of the easiest dishes to make.  It can be prepared ahead, easily reheated, frozen, delivered, and gifted.  It’s a multi-tasking meal that you all need to make, if you haven’t already.  

Weeknight Bolognese

Print Recipe
Barefoot Contessa's most perfect pasta recipe - easy and absolutely delicious!
Course dinner
Cuisine Italian
Keyword bolognese, pasta
Prep Time 10 minutes
Cook Time 20 minutes
Servings 6 people

Ingredients

  • 2 Tbsp olive oil
  • 1 lb ground beef (85-90% lean)
  • 4 colves garlic, minced
  • 1 Tbsp dried oregano
  • 1/4 tsp red pepper flakes
  • 1 1/4 cups red wine, divided I use Pinot Noir or Cabernet
  • 1 28 oz can crushed tomatoes I like San Marzano
  • 2 Tbsp tomato paste
  • kosher salt and black pepper
  • 1 lb dried pasta
  • 1/4 tsp ground nutmeg
  • 1/4 cup fresh basil leaves, torn or chopped
  • 1/4 cup heavy cream
  • 1/2 cup grated parmesan, plus extra for serving

Instructions

  • Heat 2 Tbsp olive oil in a large dutch oven or high sided skillet. Add the ground beef, breaking up and stirring until cooke through and is no longer pink in color, about 5 minutes. Stir in the garlic, oregano and red pepper flakes, and cook for one minute. Pour 1 cup of the wine into the pot and stir to scrape up any ground bits from the bottom of the pan. Add the tomatoes, tomato paste, 1/2 Tbsp kosher salt and 1 tsp black pepper, stirring until combined. Bring to a boil and then reduce to a simmer for 10 minutes.
  • Meanwhile, bring a large pot of salted water to a boil, and cook the pasta according to package directions, for al dente.
  • While the pasta cooks, finish the sauce. Add the nutmeg, basil, cream, along with the remaining 1/4 cup red wine to the sauce and simmer for a few more minutes until slightly thickened. Add the grated parmesan at the very end, then toss with the cooked pasta. Garnish with extra grated parmesan and freshly torn basil leaves. ENJOY!

Notes

This recipe is on a weekly rotation in our house, and shows up for holidays and birthdays as well.  It's easy enough for any night, but special enough for the best occasions.  It's foolproof, simple, and I love it.  Thank you Ina!
This is also a recipe you can double, triple, even quadruple for a crowd.  The sauce freezes well in quart size containers, and always tastes even better the next day.  I also think it would make an excellent lasagna sauce - maybe a future recipe!
Continue Reading

Game Day Beef Chili

The ultimate beef chili recipe, no beans, rich and hearty and perfectly balanced in flavor.

Most everyone loves chili this time of year, and it’s the perfect meal to make ahead for busy weekends, and it lasts for days as easy leftovers.  I’ve made dozens of recipes, and we have always had a tradition of this on Halloween – I hoped to get this up ahead of time, but better late than never!  This has become our favorite recipe by far.  No beans, all beef, loads of flavor – don’t skimp on the 6 Tablespoons of chili powder!  I promise it’s not too spicy.  This is almost an exact replica of Geoffrey Zakarian’s Game Day Chili – I adjusted the tomatoes a bit for consistency.  https://www.foodnetwork.com/recipes/geoffrey-zakarian/game-day-chili-2306029

I try to use good quality beef for this – it cooks for a while, and anything honestly will work, but the flavor of grass fed works really well here.  This makes a HUGE batch, so definitely plan to invite friends over for dinner.  

Game Day Beef Chili

Print Recipe
Rich and hearty beef chili
Course dinner, Lunch, Soup
Cuisine American
Keyword chili, beef chili
Servings 10

Ingredients

  • 3 Tbsp olive oil
  • 3 lbs ground beef use grass fed if you can
  • salt and pepper
  • 6 cloves garlic, minced
  • 2 large yellow onions, chopped
  • 2 bunches scallions, chopped reserve some for topping
  • 2 Tbsp tomato paste
  • 6 Tbsp chili powder
  • 1 12 oz bottle of beer
  • 1 28 oz can of crushed tomatoes
  • 1 28 oz can of fire roasted diced tomatoes
  • 2 cups chicken or beef stock
  • 2 Tbsp Red Tabasco Sauce
  • 2 Tbsp Green Tabasco Sauce

Toppings

  • cilantro
  • sliced jalepeno or serano pepper
  • full fat greek yogurt, or sour cream
  • sliced avacado

Instructions

  • In a large Dutch oven, heat the oil over medium-high heat. When the oil is hot, add the ground meat. Cook and stir occasionally, breaking up until browned all over and you can hear a slight crackling in the pan, letting you know the moisture has cooked away, about 15 minutes. Don't skip this long cooking step with browning the beef. Season with salt and pepper, about 1 Tbsp salt and 2 tsp black pepper.
  • Reduce the heat to medium. Add the garlic, onions and half of the scallions and cook until wilted, about 5 minutes. Make a space in the pan and drop in the tomato paste. Let toast for 1 minute and then stir into the meat. Sprinkle on the chile powder. Cook and stir until fragrant, about 2 minutes.
  • Pour in the beer and cook until almost reduced away, about 4 minutes. Pour in the tomatoes and stock and season with the red and green hot sauce. Adjust the heat so the chili is gently simmering and cook, uncovered, until the chili is thick, dark red and flavorful, about 1 1/2 hours. Serve in bowls with the remaining scallions and suggested toppings.

Notes

This recipe is almost exactly the same as Geoffrey Zakarian's Game Day Chili - I swapped one can of tomatoes for crushed, as I prefer the consistency, but this recipe is perfect as it is!  
Continue Reading

Everything Bagel Seasoned Grilled Cheese Sandwiches

Grilled Cheddar and Mozzarella Cheese Sandwiches crusted with grated Parmesan and Everything Bagel Seasoning

My daughter’s 18th birthday brought a crowd of 20 hungry teenagers to my back deck, and grilled cheese was on the menu.  Not just any grilled cheese, this is the real deal, all grown up with the most delicious crust imaginable – a melty layer of grated parmesan and Everything Bagel seasoning makes this SPECIAL.

One problem with grilled cheese for 20, is you don’t want to make it ahead as it will get soggy.  However, this one can be fully prepped in advance, so the quick cooking can take place right before serving.  I found the crust almost stuck better after resting in the fridge for a while.  If you absolutely need to make everything ahead, you could try using a rack nested inside a baking sheet, in a 200 degree oven.  I didn’t quite have room for 20 that way!

Everything Bagel Seasoning Grilled Cheese

Print Recipe
Cheddar and Mozzarella Grilled Cheese, Crusted with Grated Parmesan and Everything Bagel Seasoning
Course dinner, Lunch, sandwich, Snack
Cuisine American
Prep Time 5 minutes
Cook Time 5 minutes
Servings 2

Ingredients

  • 4 slices sourdough or French country bread
  • 4 Tbsp room temp butter
  • 1/4 cup grated parmesan
  • 2 Tbsp Everything Bagel Seasoning I like Trader Joe's "Everything but the Bagel"
  • 1 cup shredded sharp cheddar
  • 1 cup shredded mozzarella

Instructions

  • Preheat a cast iron skillet over medium or medium-low heat, depending on how your burner runs - you don't want to burn the bagel seasoning, so go with lower to be safe.
  • In a pie plate, combine the grated parmesan and everything bagel seasoning to coat the outside of the bread. Spread a layer of butter on the outsides of the bread for the sandwich (one side only) and then press to adhere to the grated parmesan and bagel seasoning on the outside of the bread.
  • Heat 1 Tbsp of butter in the skillet, and lay the bread down, top with cheese (1/2 each of the cheddar and mozzarella), then top with the other slice of bread and cover with tinfoil or a lid to help melt the cheese. Flip after a few minutes when the cheese has formed a golden crust.
  • Serve warm with ketchup on the side!

Notes

There are many variations of everything bagel seasoned grilled cheese, and many of them use the bagels themselves.  This variation is credit to Half Baked Harvest, using the parmesan to help form a golden crust - it's literally sandwich perfection, and goes great with creamy tomato soup....
Continue Reading